
Published on 2014-06-20 11:23
Since I came into contact with diving last year, I deeply fell into the blue abyss and couldn't extricate myself. Sure enough, others say diving is blue opium. All the way from scuba to free diving, the diving trip almost once a month, let me not only get the bronze skin, but also know how to enjoy diving.
From the master here learned this set of free diving Yoga stretching exercise, every time before the water to stretch yourself, oh, don't go below cramps can not be fun. Thank you Jessie + J for helping me write the action breakdown.
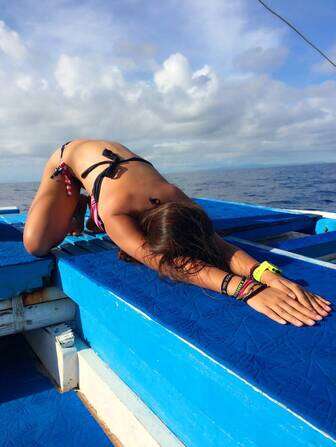
Section 1: Foundation stretching

Action breakdown: This is the basic pose of the first half of this yoga set. When doing it, first stand on tiptoe, put the ball and heel under the big toe of both feet together, open the knee and kneel in front. Then slowly seat your hips on your heels. Keep your back straight, don't pucker, close your ribs. Turn your hands and fingers together and turn them up. Keep your arms straight and lean on both sides of your ears.
Main points: pay attention to the sequence of action is to stabilize the lower body first, and then complete the hand action.
1) In the lower body movement, because free diving needs to kick the web, pressing the toes can help us strengthen the strength of the toes, increase flexibility, and prevent cramps. Students who do this action for the first time may feel pain in their toes. If they feel unbearable during stretching, they can support the ground with both hands, raise their feet, and gently tap the ground with the toes on the instep in turn to help them relax.
2) In the upper body movement, turn your hands and fingers together and stretch your arms up. You can feel a rope above your head stretching you up. At the same time, you should also pay attention not to leave your hips and heels. This movement can help us open our shoulders and stretch our arm muscles at the same time. For girls who love beauty, it can also help eliminate the worship meat / butterfly sleeve.
Advanced: if the students feel relaxed after stretching their arms to both sides of the ear, they can try to extend their arms back again, leaning against the back of the head and the back of the ear.
Section 2: Dabai stretching
Action decomposition: on the basis of the previous action, the lower part of the body remains unchanged. The upper part of the body folds down from the waist and back, and then the arms extend forward to feel the opening of the shoulders.
Main points: This is an open shoulder pose, still need to pay attention to the hips do not leave the heel. When folding the body, use force from the lumbar spine. Remember not to bow your back even if you can't bend to carrier's level. Stop where you can, so as not to oppress the spine. The arms of both hands should be straightened, so that the spine can be relaxed and extended between the two pairs of resistances of both hands extending forward and buttocks sitting backward, and the shoulder blades can be fully opened. This action can also help relieve the back pain of sitting in front of the computer for a long time. It's worth doing without diving!
Advanced: try to get your armpits to the ground, or your chest closer to the ground.
Section 3: wrist stretching

Action decomposition: keep the lower body action unchanged, turn the palm outward, turn the fingers to yourself, and press the base of the palm close to the ground.
Main points: keep your fingers straight and your palms as close to the ground as possible. If you feel difficult, you can reduce the angle of external rotation of the palm, or move the hand slightly closer to your own direction.
Advanced: you can move your palm further away from you, and then try to press the palm down.
Section 4: mandible and neck stretching


Action breakdown: keep the lower body movement unchanged (hehe, can you still hold it?) Straighten your back, press your thumbs against your chin, and look up.
Main points: sink shoulders and raise hands to feel the stretching of mandibular muscles. The waist is straight and the hips don't leave the heels. Often do this pose, double chin goodbye, no goodbye, can I say?
Action breakdown: raise the jaw to do reverse action. The lower part of the body is still in the original position, clasping the back of the head with both hands, lowering the head and exerting a slight force on both arms.
Main point: Chin close to the clavicle, rather than simply close the chin.
Action decomposition: help the neck stretch to one side with hands in turn, and the shoulder on the side without applying force will relax and sink.
Main points: feel the shoulder trapezius relax downward, and the other arm is a certain confrontation, neck stretching to moderate, strength should not be too large.
Section 5: lateral lumbar and scapular extension
Action decomposition: keep the lower body action unchanged, stretch the left hand upward, bend the elbow behind the head, hold the left elbow with the right hand to help the left elbow stretch to the right. At the same time, the head should be raised to avoid the chin, the back of the head and the elbow to form a confrontation force. After the movement is stable, continue to bend to the right side and stretch the left waist muscle. Then reverse the direction of the hand and side bend and do it again.
Main points: from the side view, the whole person is still straight, pay attention not to contain the chest and chin. In addition to stretching the waist, shoulder blades and upper arms, it also has the effect of thinning the waist.
Advanced: you can try the upper hand posture unchanged, the other hand from the back to grasp, hands up and down, clasp the fingers behind.
Section 6: leg back stretch
Action decomposition: sitting flat on the ground, you can slightly pull the buttock muscles on both sides back, legs straight, knees together, knee socket on the ground, toes back hook, hands grasp the sole of the foot or ankle, and then drive the back from the waist, starting from the lumbar fold down.
Main points: keep your feet back hook to prevent strain. When folding your body, please don't bow your back to avoid spinal strain.
Advanced: hold the soles of your feet with your hands from above your toes. If you can, try to make your forehead touch your calf.
Section 7: Saint germarich style
Action decomposition: first sit on the ground, legs straight forward, bending the left knee, the left foot sole and heel flat on the ground. The tibia of the left leg should be at right angles to the ground, and the lower leg should touch the thigh. Put the left heel close to the perineum. The inside of the left foot should touch the inside of the extended right thigh, and the right foot should be hooked back. Then, hold the left thigh with the right arm, straighten the back, lift the left arm, drive the head backward from the waist, and finally support the left hand on the ground at the back, and stay in this position. Finally, do it in the opposite direction.
Main point: twist should start from the waist, not bow back. The hips on both sides should be placed upright, and the hips on both sides should not leave the ground. Look as far back as possible, shoulders and legs in a straight line. The straight leg keeps the toes back. In addition to feeling the twist of the waist, you should also feel the stretch of the gluteus medius. In addition to good health care effect on gastrointestinal function and female reproductive system, it also helps to prevent iliotibial tract friction syndrome (commonly known as running knee) for people who are keen on running for a long time. It is highly recommended that you can also practice more at ordinary times.
Advanced: you can try to put the hand around the waist, the hand in front of the thigh through the lower side, two hands in the lower thigh cross button, deepen the twist.
Section 8: sleeping swan
Action breakdown: This is a very beautiful pose. First bend your right knee to 90 degrees ° Place the lower leg horizontally in front of the body (if you feel difficult, fold the right heel to the perineum), press the outside of the instep to the ground, extend the left leg backward, and adjust the body to press the left knee back to the ground. Then breathe slowly and reach forward with your hands and chest close to your thighs. Hold for more than 1 minute, then do it again in the opposite direction.
Main points: pay attention to the position of the crotch, hip joint parallel to the ground. Don't dangle your hips. If you can't stick to the ground, you can pad some folded towels or a yoga brick under your hips. Feel the stretch of the hands and legs in both directions, as well as the extension of the spine. This posture can help us stretch the thickest fascia of the human body, fascia lata.
Section 9: shoulder and lower back stretch
Action decomposition: open both legs and shoulder width, toe middle finger forward, legs straight, hands clasped behind. Straighten the arms, fold the body forward from the crotch, drive the waist by the crotch, and move the belt forward and downward.
Main points: keep knee straight, do not bow back, hip straight, hip parallel to the ground.
Advanced: the head is on the shin of the calf, and the hand is lower than the head.
Section 10: Achilles tendon stretching
Action decomposition: bend the left leg forward, right leg backward, toes forward, with the help of walls and pillars, or with both hands on the knees, straighten the waist and back, and push the body backward with both hands. Keep your right knee straight and try to land on your heel to feel the stretch of your right calf Achilles tendon. Then do it again on the other side.
Main points: the toes of both feet should face the front, not the back, and the legs and knees at the back should be straight. In this pose, the most intense feeling should be the muscles at the back of your leg. If you want to have long legs, or worry about the crus muscle caking after running and strength training, you can lead the way!
Section 11: front thigh stretch
Action decomposition: Na Na Na, students who want to perfect the leg shape, this last move can not be ignored! First, straighten the left knee, you can use the wall or column to maintain balance, and then the right hand from the back to grasp the right foot or ankle, knees together, so that the heel close to the hip. After staying for a certain time, do it on the other side.
Main points: legs and knees must be close together, feel the quadriceps, that is, the full stretch of the front thigh. If you don't feel it, please pull it with your heart until you want to curse your mother. The leg muscle expansion caused by squatting can be improved.
Advanced: students with a good sense of balance may as well try to grasp the instep with both hands. Or you can lift the hand that holds the wall to stretch forward and try to transition to the yoga dance.
OK, we have finished the eleven stretching exercises of Dhyana free diving yoga. Here we do a little more reminder: please don't be too demanding for each individual, just do what you can bear, and avoid over stretching. At the same time, in order to ensure the stretching effect, in addition to the sleeping swan position, each position should be maintained at the limit for 15-30 seconds, that is, 3-5 breaths. During the whole process of stretching, please keep breathing evenly and don't hold your breath. Please keep in mind that sports are imaginative. This set of movements is not only suitable for practice before launching, but also can be practiced at ordinary times. Free diving is not a matter of overnight.
Finally, I want to point out that when I introduced the postures, I mentioned so much about leg beauty and self-cultivation, because a coach once told me that "for free divers, body shape is also a professional ethics!"